One-Stop Vintage with EBTH

Today is a super good day because I get to spotlight one of my ALL-TIME favorite vendors AND attend an exciting designer event tonight! I like to think of this as my BEST-KEPT-NOT-SO-SECRET because I tell people about this resource all of the time ;-) About a year ago, I learned about Everything But The House for the first time. Their team reached out to tell me about the site, and I was actually a little floored that I didn't already know about it. To say that I was immediately hooked would be an understatement – I was addicted. In my defense, you do have to be on your toes to win the real good stuff (the site has gotten insanely popular over the last year), but I think I would probably win the 'most page visits per day by a designer' if EBTH were to give out an award.

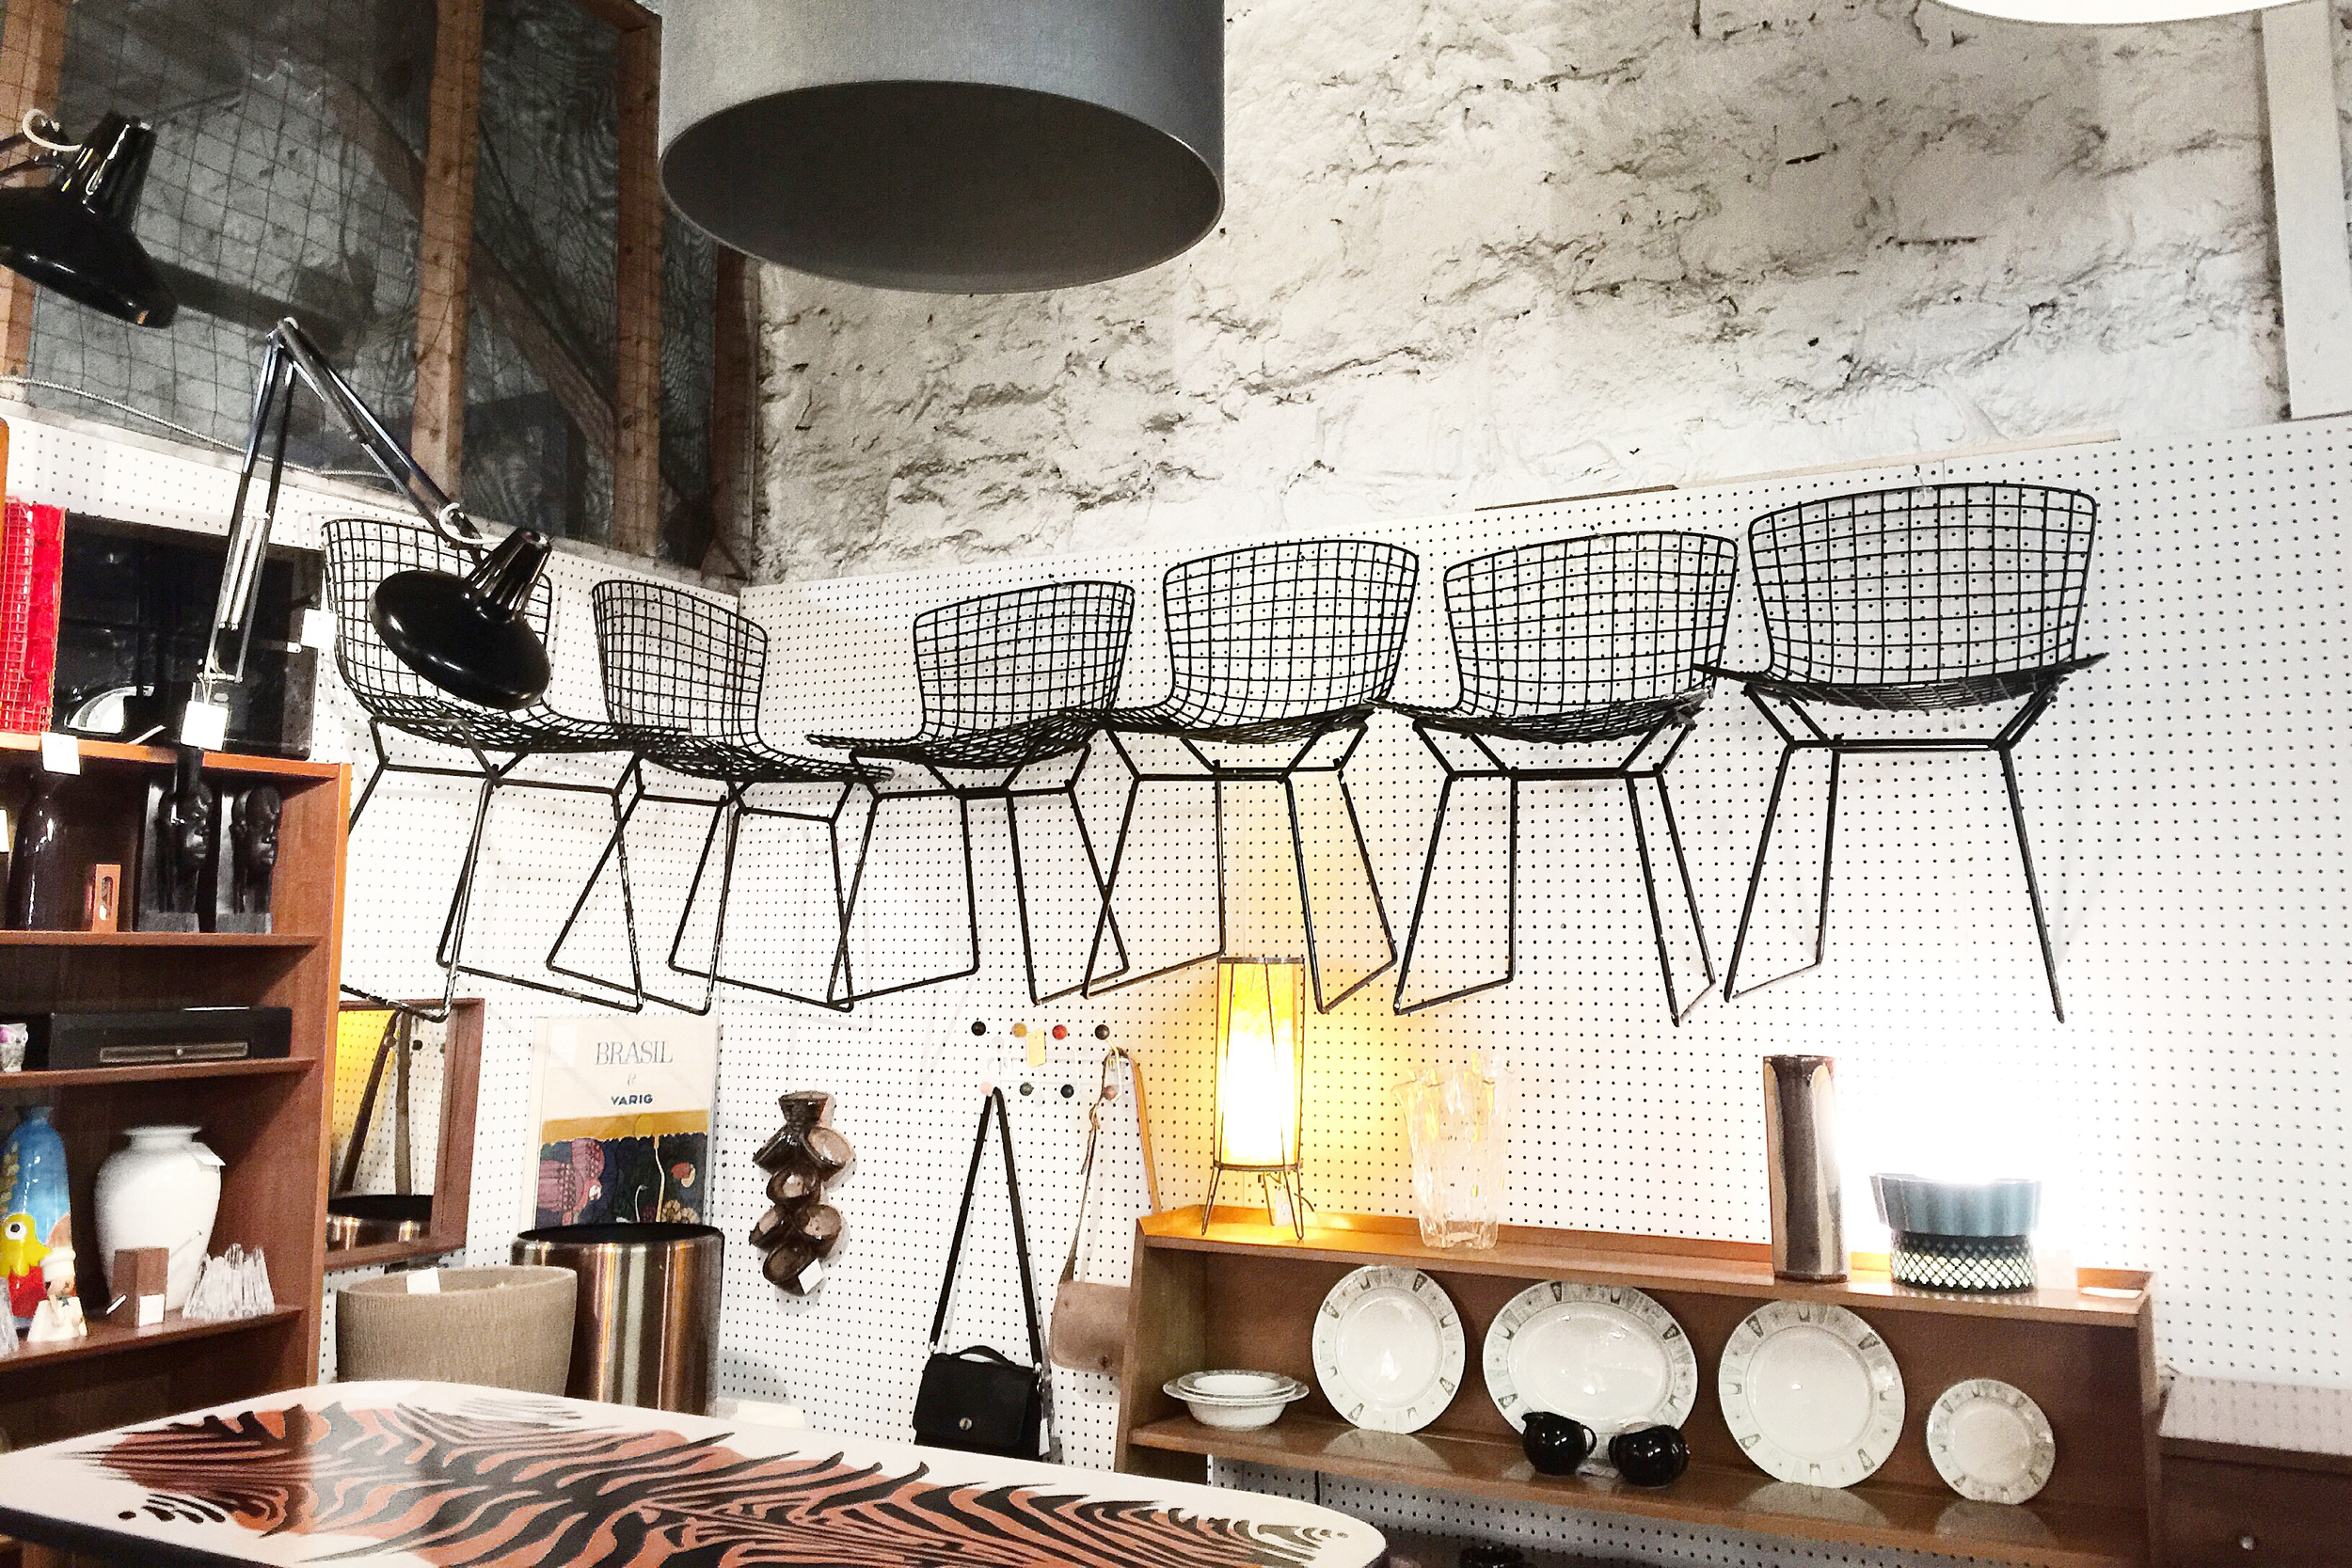
A little on how the site works: EBTH is an estate sale e-commerce site that auctions off one-of-a-kind items from homes across the country. It’s like going to flea market 24/7 and online! Basically, my dream. They sell everything from mid-century furniture to vintage rugs, and the best part is everything starts at $1. The auction format reminds me a lot of Ebay, but the user interface is a lot more friendly – I also LOVE the mobile app when I'm sourcing on the go or watching an item super closely. The vintage hunt is one of my favorite parts of my job, and EBTH just makes things a lot more accessible when I am low on time and can't get out to the markets or antique stores.

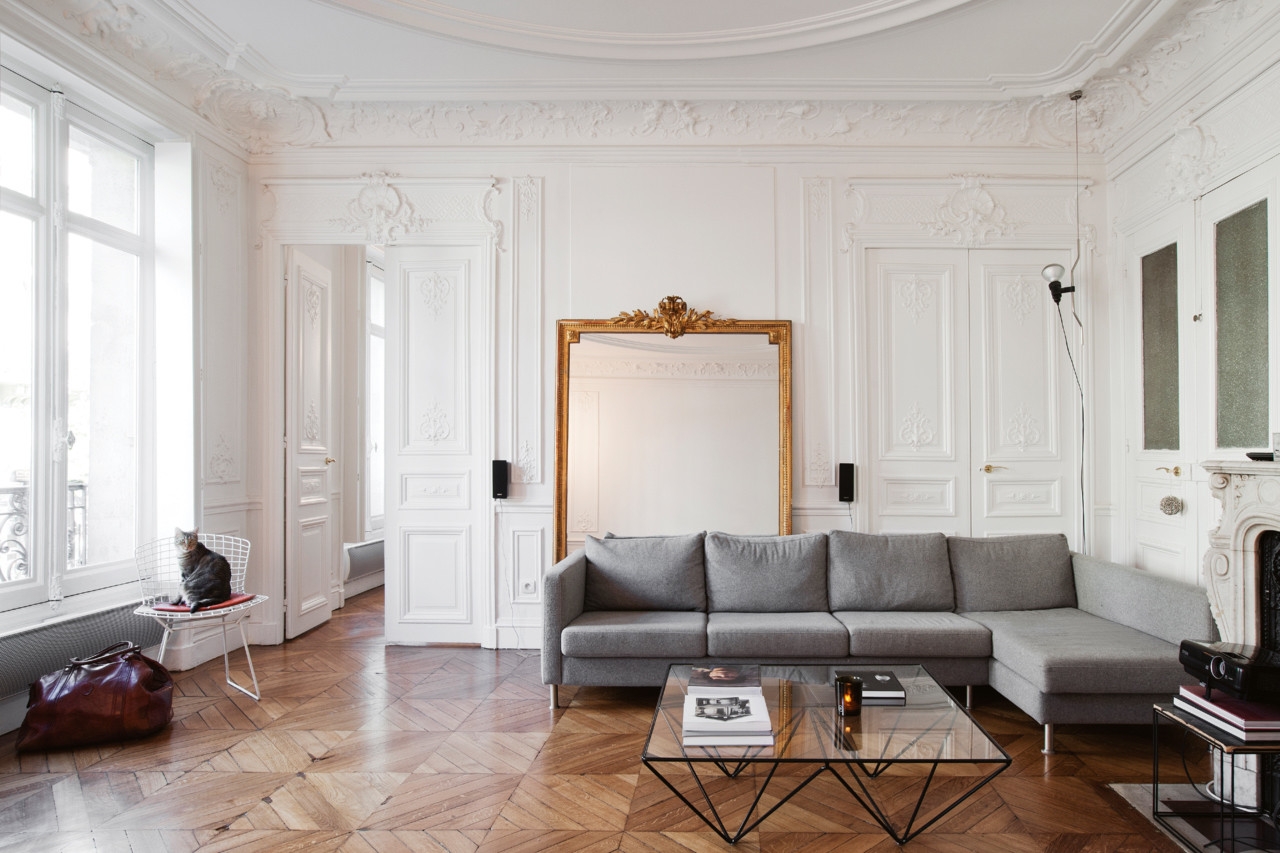
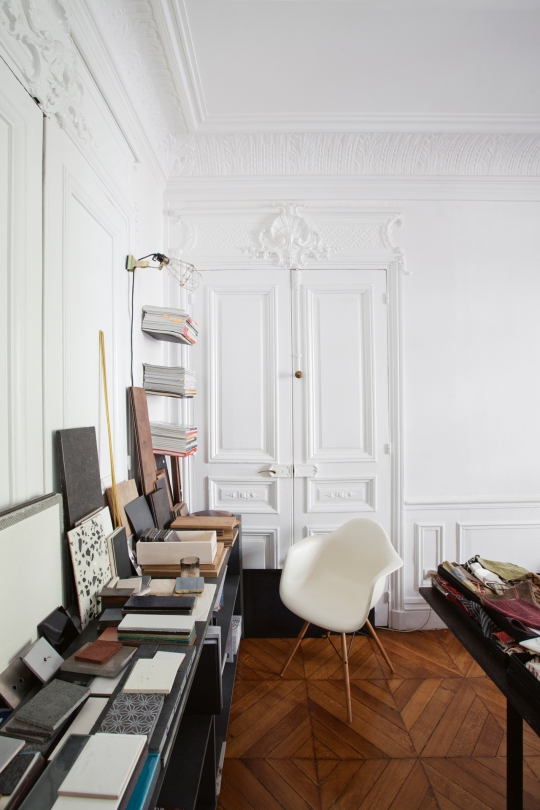
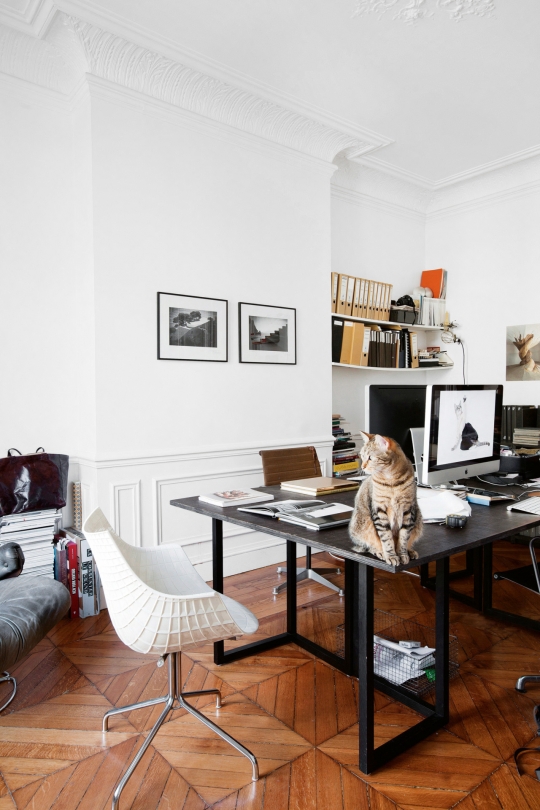
I personally use the site most frequently for rare furnishings, vintage paintings, and interesting oddities for my own home or for my projects. I have found & won DOZENS of treasures over the past year, and I've definitely had my share of heartbreak too. The auction format is competitive, but I love the thrill and rush of those last few seconds of bidding! I am literally constantly scouring the site for treasures, but I thought I'd share a few favorites from my collection. Head on over to EBTH to find the piece that sparks the conversation in your home! That Vintage European Pommel Horse does the trick for our house ;-)

EBTH-gracemade.jpg
 

GET THE LOOK: Serene & Modern Bedroom

I have a confession to make – I am so ashamed at how little I have blogged since our move in May. I got so swamped with our home renovation, that I completely neglected to share little details along the way. I've had a lot of requests for it, so I promise promise promise to share a full before & after home tour very soon. I believe that we still have a long way to go, but our home has come so very far. Our contractor has finally finished the messy construction portion of our sweet Bungalow (except for the Kitchen, which is Phase II), and I'm now focusing on the details of furnishings and accessories. I'm going room-by-room and imagining the best version of each space – for both my husband & I, as well as our guests.

We have the 'bare-bones' that make a great Master Bedroom, but I'm working on the finishing details that will make things come together. I first saw this bedroom in Domino Magazine, and have kept it close to my heart & soul ever since. HOW GOOD IS IT? I am currently mildly, nay – VERY, obsessed with deep green tones, and this simple room just captivates me. It has everything that I consider important in an amazing interior – a simple backdrop, something modern, something vintage, and an element that is gilded or metallic. This space is the inspiration for our new master bedroom, and I thought I'd share the things I've found to execute this beautiful look!

Roundup: Emily, Marble & Bertoia

PERSON

My friend, Emily Howard of Consider the Wildflowers, recently shared a FANTASTIC article on Darling Magazine. As a self-made entrepreneur, she's sharing her best lessons learned. I can't tell you how much I enjoyed her insight! This gal is a true creative with a solid business mind, and I admire her perseverance and desire to share with others.

PLACE

I recently discovered Arent & Pyke, a fantastic Australian design firm, and cannot get over their Pavilion House project. Lately, I am obsessed with 'cookies & cream' marble, and this is definitely my favorite execution of the finish. The bookmatched backsplash is an insanely gorgeous detail, and the hammered brass pendants polish the monochromatic kitchen finishes. JUST STUNNING.

This space is a close runner up...

THING

If you've spent more than 10 minutes with me, you've probably heard me ramble on about various pieces of furniture. I'm an unashamed furniture NERD. Out of them all, though, the Bertoia collection for Knoll is easily my favorite. About 2.5 years ago, I found two mint-condition Bertoia Diamond Lounge Chairs – complete with the original (and now discontinued!) Knoll upholstery. I purchased them from a retired dealer, and they had been protected in storage since the 50's. Yesterday, I was browsing through an Atlanta antique store when I suddenly looked up and stopped dead in my tracks. THERE THEY ARE! A full-set of 6 dining/side chairs in the exact same finish as my lounge versions! These chairs aren't in the same mint-condition, but I plan to continue using them outdoors anyways. I'll just quickly refinish them with a new coat of satin black Rustoleum, and we're good to go!


French Inspiration

Can I tell you a secret?

I am SHAMELESSLY OBSESSED with this French apartment. I've scrolled through the images at least 5 times, and I fall farther in love at every glance. I've been sourcing a lot of inspiration for the total design overhaul of my own home, and I am so drawn to the simplicity & elegance of Parisian interiors. It's that whole "Yeah I'm cool and I'm really not even trying to be cool" look. Modern, elegant, & simple – this space will surely inspire you too!

We've all seen this amazing image with the mirror a dozen times, but I've never taken the time to find the entire feature of this beautiful home. I love the white-on-white minimalism, the restrained use of small-scale furnishings, and the laid-back placement of art & sculpture. The whole place looks effortlessly put-together and lived-in at the same time. I am about to tackle a hot mess of a project (each room is painted a worse shade than the last), and this serene space is just soothing my body & mind!

Enjoy! xx

All images via Vogue Australia


GET THE LOOK: Trinity Ventures

Happy Thursday, folks! Today I thought I'd share a quick "Get The Look" post on one of my favorite recent projects – Trinity Ventures in SF. I've gotten a lot of sourcing inquiries on this one, and I really wanted to share a detailed list of resources to help you get started! I think that the bold accents really make this particular space, so play around and find the rugs or throw pillows that represent your style! The furnishings are affordable, and really provide a blank canvas to get creative with. Enjoy! xx

1 / 2 / 3 / 4 / 5 / 6 / 7 / 8

p.s. If you have the guts for Ebay, here is another
GORGEOUS Heriz Rug currently up for grabs @ $410!

Photo by Julia Robbs for Homepolish.


Last-Minute Style

Hi friends! I can't believe that we're already into the second week of NOVEMBER. Whaaaat?! It already feels so crazy & hectic as we begin to prepare for Holiday travel, but I couldn't be more excited for the celebrations to come. EEEEEK! On top of the typical end-of-year CRAZY-BUSINESS that we're all experiencing, Sean and I have been in a mad dash to finish designing & installing our NEW LOFT! It's seriously been the project of a lifetime, and I'm growing more and more anxious for the day that I finally get to share the big reveal!

Over the last week or so, we've really focused on the finishing touches for our home. Sean and I have worked as a team to fuze our styles and include pieces that resonate with both of us as individuals – and that's no easy task when you're both very opinionated designers. It's been a really fun process to shop together, design together, and learn a few quirky details about one another. Sometimes we agree on a certain product or piece, and sometimes we don't. It's been fun to learn how our preferences on art & furniture differ, and also how similar we are in so many ways. Sean and I have really strived to only make purchases that we're BOTH happy with, and it has made our home feel like a true reflection of our brand new little family. I really don't think that you can fully know someone until you build a home together, and I'm loving this process & phase of life that we're in. 

I decided to show you some of the things that we've recently purchased and given a spot in our new home. From books to mugs to plants, it's the finishing touches that can really make a space feel complete. I've been dying to frame a few of my favorite vinyl albums, so I finally found frames for my beloved Rumours and Eat A Peach records. The rest of the items were purchased online or from our favorite shops around town, and they're all affordable. ALSO – since it's the Holiday season (aka the season of mass gift-giving) – all of these items would make incredible gifts for that Design-loving friend or family member of yours! Emjoy :)

1. Leather Planter - this little guy lives on our desk and holds our favorite cactus plant.
2. Book - seriously, just buy it. it's so practical and such a breath of fresh air.
3. Hand-Poured Candle - I'm addicted. I've purchased it in Brass, as well.
4. French Press - this was a wedding gift - I'm in love!
5. Mother-in-Law's Tongue - you can't kill 'em.
6. Mug - this is Sean's "Man Mug." It's man-hand sized and I'm not allowed to touch it.
7. Mousepad - it wears beautifully and it's so well-made
8. Concrete & Brass Table - this functions as my just-girly-enough bedside table!
9. Kitchen Towels - thanks, Mom. I love you.
10. Serving Bowl - our leftover Halloween candy lives here.
11. Vinyl Frame - these are so perfect & minimal.
12. Ceramic Bud Vase - that perfect shade of nude. I love pairing ours with a "Pincushion" flower.


Renter's Woes: Ugly Stairs

Congrats!! You've officially survived the Craigslist hunt of your nightmares and found the Renter's Paradise that you dreamed of!!! It has all of the 'majors'  – a dishwasher (um, WHAT!?), those to-die-for built-ins, and the right number of bedrooms with proper adult-sized-ish closets. Soon after you sign your lease, you move in and discover ALL OF THOSE annoying details that actually grind your gears every single day!! Hark – I come bearing good news!

Most people don't realize that you don't have to live with everything that you hate about your rental. I'm here to share a few of my favorite tricks & quick fixes that will make all of your renter's nightmares evaporate into thin air – kiiiinda like last week's stash of Halloween candy. OOPS.

The first installment in my new 'Renter's Woes' series involves an easy makeover for wooden stairs – correction: REALLY-REALLY-UGLY wooden stairs, like mine. When we moved into our Loft, I sat around for months hating every single trip upstairs. Oh trust me, I almost broke down and painted those suckers on multiple occasions. If you live in a renter's market like mine, though, you're probably not willing to forfeit that absurd security deposit. Thankfully, I recently discovered an amazing and truly magical product and I decided to use it to solve my Heinous Staircase Dilemma.

stairs_before

See what I mean? All that awful wooden-chip subfloor nonsense is just too much. The magical product that I discovered is Hygge & West's Removable Wallcovering Tiles. Hey Renter's, your keyword here is re-move-able....MAGIC! You can slap these babies on your eyesore of a staircase in a few easy steps, and easily take 'em off before you move out. I'm about to show you how...

Step 1: You're Really Gonna Need A Template. Nobody wants to sit there and hand-measure wallcovering for each and every riser. A standard template, cut to the size of your riser, will make all of this a lot easier. Tip: the riser is the 'front part' of the stair and will typically be around 7" high x 30-36" wide, but I'd pull an exact measurement using a tape measure.

  • Measure your stair riser. I guarantee that there will be one or two stubborn risers that are a little off in size. That's okay – we'll fix it later.
  • Grab a piece of cardboard. I used the hardback of a large-scale drawing pad. Shoot for a denser material – it'll make things easier when we get to the cutting process.
  • Cut the cardboard to the size of your riser. Depending on the width of your stairs and the size of the wallcovering tile you're using, you might need two pieces of wallcovering per riser. This was the case for my stairs, so my template was actually cut to fit 1/2 of my riser.

Step 2: Trace & Cut Your Wallcovering

  • Place the template over the wallcovering tile, and trace a piece for each riser.
  • Remember, if you're using two pieces of wallcovering per riser, I'd recommend matching the pattern in the center. It can get a little tricky when you start cutting, but just pace yourself and lay the pieces out on the floor.
  • Use a cutting mat and an x-acto blade, and carefully cut your wallcovering along the lines that you've drawn. This is the part where I'd be EXTRA careful. These wallcovering tiles aren't cheap, and you really don't want to mess this up.

Step 3: Get Ready For Install

  • To keep things organized, I laid out each piece before installing. My wallcovering style has a pretty intricate pattern match, and I wanted to be sure I didn't mix up the pieces.

Step 4: Peel And Stick. BE PATIENT. Here comes the frustrating part. 

  • I installed my pieces starting from the bottom riser and worked my way up the staircase. 
  • Tip: most removable tiles are multi-use. This means that if you mess up, just gently pull the piece off and re-apply. I would try not to do this multiple times, but it's going to be fine if you accidently stick something crooked the first time.
  • Be sure to apply extra pressure to the corners and work out any bubbles (there won't be many).

Step 5: Trim As Needed

  • Remember that pesky riser that I mentioned? The one that is annoyingly 1/2" shorter than the rest? Keep a pair of scissors handy and trim manually when you get to it. 

Step 6: Take A Step Back And ENJOY!

What do you think?! It makes a big difference, huh? In my own life, this is definitely one of those drab-to-fab Cinderella stories that I fully intend to recount to our grandchildren. Enjoy!

*All wallcovering was generously provided by Hygge & West.


New Project: Vurb Headquarters

Helllllllo tech office lovers!

I'm pretty excited to share one of my recently completed Homepolish Commercial projects – the office space of Vurb in Downtown San Francisco! The complete renovation took many, many months to complete, but the end result was totally worth the wait (and hard work!). As an Interior Designer, I can't help but get excited about a project like this. Not only was the client incredible, but their space itself – located within a historic building in the Financial District – was definitely the cherry on top. My eyes probably bugged out of my head when I first saw all of the BRICK! We paired the existing brick with a few modern finish updates, a graphic branding wall, and some bold color pops – including splashes of Vurb's very own "vurple" – and, VOILA!, a place where you can love doing what you do!

For more fun photos and product details, head over to the project feature at Homepolish!


The Sofa Series: Part I

Okay, ya'll, let's talk about furniture. Today, I want to begin addressing one of the most difficult decisions one faces when crafting a living space – selecting the right sofa. Seems relatively simple, right? I mean, it's just a sofa. Wrong.

I recently learned this, firsthand, while selecting the best sofa for my own space. Yes, even Interior Designers struggle with decision-making in their own homes. No kidding, ya'll, I lost sleep over this decision. There is an endless list of companies selling "the perfect sofa" – and then you've got to deal with size, shape, color, foam density, and the list goes on. For me, everything got easier when I found the right manufacturer, but there was still a long way to go. For Part I of this series, we're going to focus on Form. We'll get into the Pretty Nitty-Gritty (color, style, fabric, etc) in Part II. For now, let's chat about manufacturers, size, function, and shape...

Where do I even look?
If you've ever considered purchasing a sofa, you've learned that those suckers can get expensive. Unless you can afford that perfect $10,000 sofa at the name-brand luxury furniture store, you're going to have to do some hunting. Like I said – everyone is going to tell you that their sofa is superior, but most are lying. With many of the other mid- to upper-tier furniture companies,  you're dealing with the poor construction of really bad materials that happened to be wrapped in an okay-looking upholstery. From the outside, some aren't too terrible looking – especially when styled within that ideal in-store vignette.

These "value" pieces just aren't going to hold up, though, and you can bet on that one. When starting the process of designing my own home, I quickly learned that I wouldn't buy my sofa from the mass-retailers that most turn to. I began searching for something new and different, and eventually stumbled upon Interior Define. FINALLY! I know where I will buy my future sofa. Let me just tell you – finding this company was like breathing a big gulp of fresh air. The customer service is transparent and personalized, and the staff is knowledgable, accomodating, and friendly. Best of all, each sofa is completely custom and bears a price tag 30-40% lower than many comparable high-end brands. SOLD. 

Size
Now that you know where you'd like to purchase your sofa, we need to think about sizing. Obviously, this decision hinges drastically on the size of your space. I'd begin by thinking about the focal point of your room. Do you want your sofa to serve as the main feature of the space, or would you like to include other statement pieces of furniture? If you've already invested in large-scale heavy lounge chairs, I'd consider a smaller sofa with a lighter frame. If you're like me, and already own smaller-scale lounge pieces, you're in the safe zone for a large-scale hefty sofa that demands some respect. My lounge chairs are a set of vintage Bertoia diamond chairs, so I opted for a bulky sofa that would offset the dainty frame of the chairs. It's all about balance and identifying a feature for the space.

Besides considering the shape of the room, I'd also consider your ceiling height. Most people don't weigh this major factor into their furniture selection process. Did you know that your furniture can make your ceilings look higher or lower, depending on their scale? Ultimately, you can create a room that seems bigger than it actually is – you just need to know how to choose the right furniture! What is the height of your ceiling? If you're on the lower end, I'd go with a sofa with legs and an airy frame – like the Owens or Asher. The lightness of the sofa will give your space the illusion of higher ceilings. If you've got a space with higher ceilings, like a large and open loft, I'd select a lower sofa that will deliver the illusion of a more intimate space with lower ceilings. The Ainsley and the Gray are great options for this type of space.

Function
Knowing the desired function of your sofa will help you make decisions about the components of its construction and its orientation within the space. We'll get into upholstery options in Part II, but seat density is something that you'll want to consider early on. Fortunately, Interior Define offers countless custom options online, but they offer even more options over the phone or in person at their flagship Chicago showroom. If you want your sofa to be oriented for TV-watching and serve as a big fluffy cloud to cuddle with a bowl of popcorn, consider requesting a low-density foam with mega-softness and "give" in the seat- and back-cushions. It's a recipe for daytime naps and movie marathons. If your living room will be a place used primarily for conversation or family games, I'd request a firm high-density foam construction that will allow more upright sitting. Both construction types will be extremely comfortable, but Interior Define's high customization let you take things to the next level. Each sofa is available in 3 different cushion-fill options, so have some fun exploring and choosing the right one for you!

Shape
Finally, let's chat about shape. For this part of the series, we're not getting into "style." For now, let's talk about shape in its most simple sense We've got a few options to look at. Most sofas are made with one of three basic shapes – straight, straight with a chaise, or full-on L-shaped. Round or curved sofas our out there, but their application is far less common. The size of your space and desired function of the sofa will help you make a decision on shape, but it's good to consider a few more factors. With the right shape, a sofa can serve as a great separation between two spaces. If you're dealing with an open floorplan, use an L-shape sofa to separate the living and dining areas. The Crawford is the perfect shape to act as a divider. If you're interested in adding a collection of lounge chairs and side tables, I'd go for a clean straight-run sofa that will consume less square footage. I love the simplicity of the Sloan and the Lucy. These sofas will also prepare your landscape for the execution of almost any style. For you nappers and movie-watching moguls, a straight sofa with a chaise simply can't be beat. If you've got the space for it, this shape will deliver supreme comfort and flexibility. Shape is typically the easiest part of the sofa-selection process, especially since most of Interior Define's designs are available in 5+ configurations. Fortunately, if you've fallen in love with a style, it's likely available in many different shapes and custom sizes. 

Stay tuned for Part II, ya'll – we're going to chat about all things pretty! In my next Sofa Series post, we'll get into upholstery materials, color, and style. 


Accessory Roundup: Raw & Californian

Hello, Friday! I'm so glad to greet the weekend again. It's been such a long and fast week, so I'm just looking forward to some relaxation. I probably worked for 15 hours yesterday (but like the boring kind of work), so I was excited to wake up this morning and prepare an accessory package while sipping my coffee. For this project, I'm executing a laid-back Californian aesthetic for a family living in the Mission. For the living space, I've selected an assortment of objects that feature natural materials and organic lines. I can't survive without some contrast, so I've complimented the warm Californian tones with rich & graphic pops of black. I hope you'll find this roundup inspiring & helpful, and I hope you have a great weekend!

californian eclectic.jpg
 

Atocha Design

Vinyl enthusiasts, BEHOLD. I've found the perfect furniture for your record playing shrine. I can't get over the quality and detail in Atocha Design's pieces. Each one carries a timeless elegance – it seems like the only proper way to display and store your hard-earned vinyl collection. The cherry on top? Each piece is handmade in America. You can't beat that.

Imagery c/o Atocha Design


A Classic Edge

Phew! Never have I ever been more excited for a Tuesday. I'm just so glad to see the busyness of Monday behind me. I have so many exciting current projects, but they're keeping me running around like a crazy lady! I appreciate those little Residential projects, with incredibly down-to-earth clients, that give me a moment to breathe. I just delivered bedroom designs to such a client last week! I don't typically share projects in this format, but I thought that I'd give it a go. I really love what I created for this young couple's bedroom oasis – and I'm even a little jealous of what their space is about to become. We're installing a wall of classic built-in's along one wall, and leaving the rest of the space open for moveable furniture. The finishes are warm white walls, solid oak shelving, and brass hardware. We're complimenting the muted palette with graphic artwork and a geometric chandelier. The leather stool will keep the man happy, and the swing arm sconces are all-too-perfect for bedtime reading. I can't wait to share the final photos when this one is installed!